Studio - Window, Floors and DoorsWhat used to be just a layer of glass to the outside was turned into a closet. Before any of the pictures above were taken, the windows themselves were sealed off. All told, from the outside in, the windows were covered with:
So, all told, there are nine layers between the window glass and the back wall of the closet. Then, if you count to the inside of the room, there is an additional layer of 1/2" drywall, insulation, another layer of 1/2" drywall, and a layer of the grey sound board. Below you can see a (current) photo of the solid-core door, hardware and molding that I added to finish the closet. 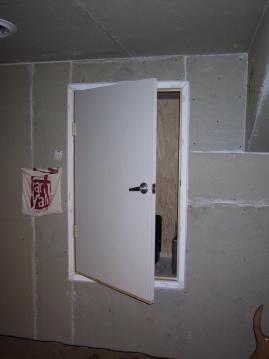
Studio - Floor and DoorWait! That’s not it. Even though I already soundproofed the attic, gabled ceiling, ceiling, and walls of the room, there were two more crucial sound-proofing areas to consider: the floor and the door. The thing with the floor is that it’s important to mechanically decouple it as much as possible. This means that the new floor should (a) not touch the walls, and (b) be "floating" on a layer of some soft material. After pricing various alternatives, I finally settled on these snap together 1/2" rubber sheets. 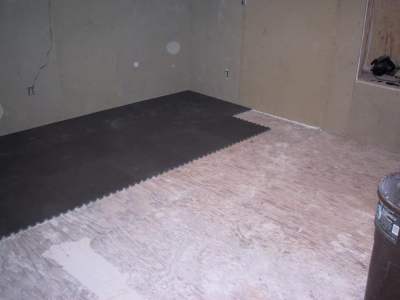
On top of these sheets I laid an additional two layers of 3/4" plywood … very heavy … in such a manner as to ensure that there were no overlapping seams, and that the plywood did not touch the walls. The two layers of plywood were then screwed together, taking care to not allow the screws to touch the original floor. Thus I ended up creating a "floating" floor. On top of the plywood I added new padding and brought the original carpet back in. I also tossed the old interior door, and added a new 1 3/4" solid core door to the room. Because of the new raised floor, it has to swing the other way (from the outside in), and I added weather stripping so that when it is closed it is airtight. |