Drawing, Diagrams, Schematics, Etc
Almost as soon as I got Rhapsody, in fact, even before, I started making
drawings and diagrams of the boat and it's systems, particularly the
electrical system. Although these are not, per se, improvements
to the boat, they do add value, and since I've got them, I thought I'd
go ahead and post them to this webpage. Perhaps they can be useful
to other Beneteau 510 Owners.
Note that these diagrams are as they were the day I made this webpage.
I will not be updating the webpage, although I hope to update the diagrams
continually as I continue to learn about and modify Rhapsody. I
have mostly posted the ones that I converted to softcopy,
but also included a few of my raw pencil diagrams, if
softcopy was not available.
All New AGM Batteries (House and Engine)
Batteries need to be replaced every so often, and many of Rhapsody's
were past their expiration date. When I took out the old ones, it was clear
that some had been leaking (cracked?) because there was about 2" of
battery acid in the bottom of the compartment. Yech. It was actually
quite a mess to clean up.
To prevent that from occurring again, and on general principle,
I decided to replace all the batteries (even some that were
bought as recently as 2 years ago), with brand new, sealed,
maintenance free, AGM batteries. Since there is a genset
starting battery, TWO group 27 engine starting batteries,
and TEN house 6V golfcart batteries, this was a considerable
expense and a bit of labor as well. I have not yet replaced
the genset starting battery, but will before I
leave on the trip.
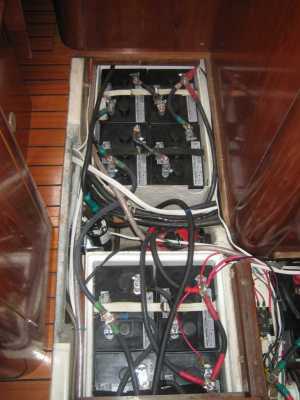
This is a truly massive battery bank. Not counting the
Engine or Genset batteries, just the house batteries
total nearly 1000 amp-hours of storage. By comparison,
my last boat, Mandala, had about 300 amp-hours of storage, total,
including the engine starting batteries.
Since I expect to use approximately 100 to 200 amp hours per day
for refrigeration, water-making, lighting, instruments, radios,
computers, autopilot, and everything else (except air-conditioning,
which requires the generator to be running), this means I could
go 5 days to a week without recharging the batteries. However,
of course, to prolong life, you never want to discharge a battery
past about 50%, so more likely I will still probably end up
running the generator every 2-3 days.
Another way of looking at it is that having such a large
battery bank means that they will last longer. Whereas
you might get 300 charge-discharge cycles out of
batteries that are run down 60% each time you use them,
you might get 3000 out of batteries that are only
run down 10-20%.
As far as recharging goes, there are battery chargers
on Rhapsody that can be combined to put out about 140 amps,
so the entire bank can be charged in something like 8 hours, and
should be easily topped off in two or so hours every other day.
And she also has a solar panel that contributes enough electricty
(about 5 amps while the sun is shining) to nearly
handle the refrigeration, or perhaps more importantly,
keep the batteries topped off (and the bilge pump working,
indefinitely) if I'm away from the boat.
New Interphase Forward Looking Sonar
Rhapsody came with a Raymarine DSM300 sonar (Fishfinder),
and the makings of a second, Autohelm ST50 sonar (Depthfinder).
Sonar, of course, uses sound waves to look thru the water
in much the same way that radar uses radio waves to look
thru the air. Both of these sonars are termed "down looking",
because they look straight down under the boat.
Thus the ST50 merely measures the depth to the bottom under
the boat, and the DSM300 traces a picture of the bottom
directly under the boat as you pass over it.
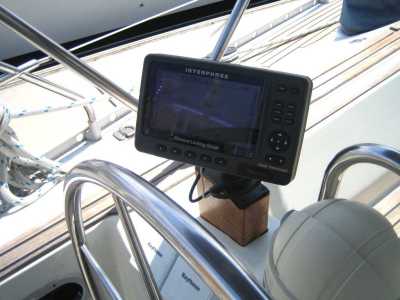
In recent years, another kind of sonar has become available
to private boat owners. It's called a "forward looking
sonar" or FLS, and instead of looking down, as you might
have guessed by the name, it looks thru the water in front of
the boat. Whereas the other sonars can only tell you what's
directly under the boat, the FLS can be used as a collision
avoidance system by giving you an idea of whats in the
water in front of the boat, which is arguably as, if not more,
important than what's under it.
On my previous boat,
Mandala,
I had installed an Echopilot FLS and had come to enjoy both
it's functionality, and the redundancy it provided.
Many times the FLS made me feel
more secure when entering an unknown anchorage or working my
way around an island in new unknown waters. Also, since the
FLS also measures the depth, just having a redundant sonar
gives me two readings, and thus more faith in both of them
as a result, and a backup in case one of them failed.
With Rhapsody I decided to get the even more capable Interphase
Twinscope II FLS. It has two modes of forward looking: horizontal
and vertical, whereas our previous FLS had only the vertical
mode. It also has more range than the Echopilot (1000 feet
in front, as opposed to 300), giving more time to react
to potential problems.
The vertical mode scans a line from directly under the boat to
directly in front of the boat. A smooth bottom shows as a
straight horizontal line across the screen, whereas a shallowing
bottom would show as a diagonal line from left-bottom
to right-top. The above picture, on the left, shows a
bottom that slopes down slightly in front of the boat.
The additional horizontal mode scans from left to right,
over an arc of 180 degrees in front of the boat, angled downward
about 10 degrees. It can be used, for instance, to find the deepest
channel between two reefs, or to stay in the middle of a river when
going up stream. I think this functionality might come in handy
when threading my way around the reefs in the Caribbean.
In any case, I now have three working sonars on Rhapsody, and
if nothing more, the added redundancy alone will be valuable.
The FLS was pretty easy to install. The boatyard installed
the thru hull during the haulout, and I ran the cables
back to the port helm, drilled holes, and mounted
the unit. I made a fairing block (visible in
the first photo above) out of a solid
piece of 4x6 maple and the FLS pretty much worked the
first time I tried it. A very useful addition, I believe.
Oh, and the FLS also works as a general display
device in our "integrated video system" (see next
page for details), so one can watch DVD's on it
or see the image from the bow camera that I've
mounted on the front of the boat.
New Cockpit Instrument Panels (hookup ST50)
I mentioned the ST50 Depth Finder in the previous section.
When I got Rhapsody, it was not hooked up. In fact
there was a unhooked sonar sensor in the Mast Step Compartment.
The wire leading from it was cut. Another wire leading forward from the
ST50 was also cut. I tried hooking them
together, but that didn't work. Either the sensor
was incompatible with the display head, or the sensor
istelf was not working because the ST50 kept reading "65 feet"
when sitting in our slip in just 12' of water.
At that point, I figured I would just go without
the ST50.
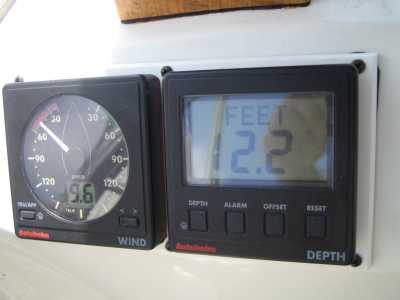
Then, the day before we were done with the haulout,
I was going thru a pile of junk that had been on Rhapsody
that I'd brought home to the garage to sort out, and
lo-and-behold, in it was a brand new sensor for the ST50.
So, the next day I rushed down to the boatyard and had them install
the additional sensor. However, hooking it up to the display head
was a bit of a problem inasmuch as someone had
GLUED the instrument heads in place. Yikes.
So I gingerly ripped the instruments out of their sockets,
and then made a screw-on instrument panel to hold
the ST50 and the wind direction indicator (shown),
and another for the autopilot head (not shown).
The panels are white "marine wood", which is
actually a tough flexible plastic, with cutouts, rubber gaskets
and screw holes. After mounting the new panels with
black screws, and connecting the ST50, everything worked great.
So now if I have to get at the wires to
the instruments, I just unscrew the
panels and remove them ... duh.
Rework Engine Panel (new ignition switch, lights, hourmeter, socket)
In the bigger scheme of things, the work I did on the Engine
Electrical Panel was, I guess, pretty minor, but it still
took time, so I thought I would mention it.
First, I replaced the ignition
switch because I could not get a duplicate of the old
ignition key made, even after going to all the locksmiths
in town and searching the internet. I even tried Beneteau USA,
with no luck. The only solution, it turned out, to having
a spare key was to replace the entire switch, which I did.
Then I discovered, most, if not all, of the light bulbs behind the panel (7)
were burned out, so I replaced them, too. The hourmeter bezel
was so glazed you could barely read it, so I replaced the
hourmeter next.
Finally, the 12V socket was not the usual automotive type, so
I replaced it as well. I also diagrammed all of the connections
(see diagrams above), reconnected some disconnected wires
(for the boom mounted mast light and windlass) and labelled
some switches.
Rework Electrical Panel (new breakers, LEDs, and fuses)
The electrical panel on Rhapsody needed quite
a bit of attention to bring it up to par.
For instance, 13 out of the 24 LED indicator lights
were burned out, and there were 10 or 12 disconnected
wires just dangling behind the panel.
So, I spent a LOT of time tracing wires,
diagramming and debugging the electrical system,
and figuring out how to make it right.
After I replaced the 13 LEDs (finding new
ones and soldering them in place), I found that two of the
breakers were bad, so I replaced those. Of course,
the breakers, being European, were very hard to find.
After about two days of looking for them on the net,
I finally got them, and some spares, from Beneteau USA.
I added a 5 amp fuse to the panel (rather than a breaker)
for the Black/Fresh Water Monitoring systems. This way it would
normally be "on", and no-one could accidentally turn the Tankwatch
system off (and hence overflow the head with waste). If
I want to turn it off, I remove the fuse. Since
normally the monitors draw no power (unless you query the
tank levels), I felt a fuse was a better choice than
a breaker.
I also re-purposed two unused "Bait Pump" switches
(in the middle of the panel in the picture above),
and used them to control the Deck, Spreader, and
Boom lights that are were previously on separate
(and illogical) breakers, but are now all running off
the (sensible) Deck Light breaker. Then finally, I added
three new U.S. breakers and indicator LEDs
(the white switches to the right and below center
in the picture above) to control the new Macerators,
the Computer, and a set of additional 12V sockets.
In reality, the work on the Electrical System was very
complicated and took a lot of time.
Mostly because there were a number of vestigal systems
on the boat that were only partially removed by previous owners,
or things were hooked up in illogical ways that made them
hard to understand and use.
For instance,all the wiring (and cooling water plumbing) were still
in place for a freezer compressor that was no longer
on the boat. Someone had merely removed the pump and
disconnected the wires at the panel, but left them
strung throughout the boat. That included 5 relays,
connections to the battery, as wells as a sea
water cooling loop that ran off the engine cooling
pump! Not the best work I'd ever seen, that's for sure,
and like I said, it took a lot of work to figure
it all out before I felt confident making any changes.
Now, I am happy and somewhat proud to say, that virtually
all of the wiring on the boat makes sense, and that most of
the switches, valves, and so on are well labelled and
documented, and also, to my satisfaction, there
are no more partial vestigal systems on the
boat anymore.
So, although it took a lot of time, these electrical
improvements have had a secondary benefit.
I now understand a lot more about how the boat works,
have gathered a lot of spare parts, and feel
confident that I can fix almost anything,
particularly in the electrical system, that
could go wrong in the future. So, that's a nice
side benefit of doing all of this work myself.