Dinghy And Motor
I purchased a used Achilles 8'8" Hypalon Inflatable with a
6hp Tohatsu Motor from an ad in the
San Diego Reader Magazine. One of the very first things that
I decided I would need was a dinghy. I felt that I wanted
the extra security of having one onboard for use as a life-raft
for our local coastal cruising, but also as a utility tender, and
hopefully as something of a water toy when the water warms up or
I head south.
Although a packaged life-raft would probably be better
(safer) for extended coastal or ocean cruising, I feel that,
as an emergency vessel, when accompanied with a ditch bag,
the dinghy provides a significant level of additional safety,
while still providing useful transportation and fun that
you don't get with a life-raft. I will still consider renting or
purchasing a life-raft if I take an extended
cruise, but I like my little inflatable.
It has a high pressure inflatable bottom and came with oars,
fuel tank for the motor, foot pump, full documentation, and so on.
I registered it with the DMV, according to regulations, so it even
has a license number and pink slip. The dinghy and motor
were only 6 months old, and in virtually perfect shape,
when I purchased them, yet at a substatial 40-50% discount
to what I would have had to pay new. I have used it
to go from the boat to shore in
Avalon
harbor and back a few times, but have yet to get up to planing speed.
I look forward to playing with it more, as a toy, in
the summer months.
EPIRB and Handheld VHF
The next thing I wanted was an EPIRB. These are the emergency radio
beacons that broadcast your a distress signal to a satellite in orbit
above the earth. The satellite triangulates your position and
sends a message to the Coast Guard and/or other National or Local
emergency services dispatchers, who then automatically, and almost
without fail, mount a search and rescue effort for you.
These are very serious devices. For instance, they are labelled
as a "device of last resort", and the instructions are very clear
that it is against the law to trigger them except in an emergency.
In fact, you have to register them with the Coast Guard, by mail,
and each device sends a code which allows the Coast Guard to
identify you (and your boat) when triggered, which can help in a
rescue effort.
There are different kinds, including some that automatically
activate when immersed. I opted to get a manual one (you have to
press a two buttons simultaneously for 5 seconds), but the one I
got also includes a GPS receiver. So it also sends out my position,
as data encoded in the radio signal, which is much more accurate
than merely triangulating the position from outer space, which is
how it would work otherwise. This means that
the rescue effort can be much more focused (down to within mere meters instead
of anywhere within a few square miles) which in turn can save critical time in
an emergency.
The other device that I wanted right away was a hand held VHF.
This can be used when one person is on shore and the other on the
boat, or as a second radio for listening to the weather broadcasts,
scanning other channels or whatever while the main radio is in use
or monitoring a specific channel.
The EPIRB and Handheld VHF are mounted on the starboard
side main salon bulkhead, where they are easily found in
an emergency. The emergency ditch bag is stored just below
this (behind the navigators chair), and the idea is that
in an abandon-ship situation, these two devices will be
thrown into the ditch bag before the ditch bag is taken
overboard.
Electrical Panel, 12V Sockets, 700W Inverter
I guess in 1990 no one thought about all the 12V plug in stuff
we would see here in the 21st century lol. There wasn't a single
12V socket on the whole boat! So I added a 12V fused and
switched electrical panel, six 12V sockets and a 700W inverter
and it's associated 110V socket to Mandala.
The panel has four switches that control the 12V sockets and inverter.
The first 12V socket is at the aft of the
bottom starboard shelves above the setee table, and I use it
for my laptop computer plug. The next three 12V sockets
are in a bank at the foreward end of the chart table shelf.
I use these variously for a rechargeable spotlight,
the rechargeable handheld VHF, an AA battery charger, and/or to recharge
my cellphone. The final two sockets are found in the cockpit,
one next to the autopilot bracket, and one on the back of the
instrument pod. I use the later of these so that my handheld
GPS does not need to run off batteries while being used at the helm.
The Inverter is in the aft battery compartment (under the
aft settee seat). It is mounted with heavy tie straps that
are screwed into the fiberglass of the seat. A 110V socket
connected to the inverter is located at the aft of the top
starboard shelf. Since this is 700W max (and 400W steady),
it is not very powerful ... I use it only for battery chargers
that don't run off 12V (like for my cannon digital camera).
Together these 12V sockets and the inverter mean that I
can run a lot of stuff off of 12V that I wasn't able to
do before. Having them individually switched (and fused)
means that I can leave everything plugged in, and only
turn the chargers and wall-warts on when I need them,
which is not only convenient, but also saves power.
Water and Waste Tank Level Indicator
Mandala came with a "Tank Alert" unit, which is a single
red LED that comes on if the waste water tank gets too full.
It only comes on when there's no room left to use the toilet
anymore. She did not come with any level indicators for the
fresh (potable) water tanks.
It only makes sense that you would want to know how much
water and waste is in your tanks before they are full (waste)
or empty (water). Imagine trying to drive a car without
a fuel guage! Or imagine finding out in the middle of a
shower that you were out of water! Better level indicators
enable you to better anticipate (and plan) when you will need
more fresh water or empty your waste tank.
So I decided to install a Snake River Tank Level
Indicator on Mandala. The unit is very well designed and
generally simple to understand and install. You stick
two pieces of special foil tape (2" wide, like duct tape)
to one side of each tank, attach the wires, program the unit,
and it works.
In my case the hard part was getting to the sides of the
tanks. The waste tank was enclosed in a factory
built fiberglass-plywood box with no room on the sides.
So I had to cut and break the box apart,
before I could attach the foil and wires to the holding tank,
and then I had to re-fiberglass the outer box back
together. It was hard and messy work and I got some
scratches on the back of my hand against the rough
fiberglass-plywood while trying to spread the
tape vertically on the waste tank, and working with
fiberglass and epoxy is always messy.
Fortunately the water tanks, which are under the aft bed,
when empty, can be moved a few inches without detaching, cutting
or breaking anything, and so they went relatively quickly compared
to the black water tank.
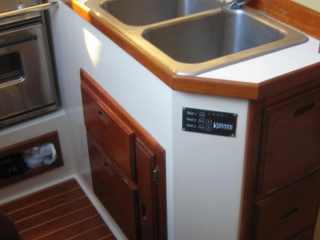
The control unit is mounted on the corner of the
kitchen counter, between the drawers and the sink.
After running the wires from the tanks to the control
unit, and running a power cord from the main electrical
panel to the control unit, I was able to test and calibrate
it.
You have to empty and fill the tanks to calibrate them.
When empty, you press one key combination to set the empty level
and when full, another combination to set the full level.
The control unit can display the results for three
separate tanks (which is what Mandala has now), but can
be upgraded to a bigger unit (without rewiring the sensors)
to add additional tanks to the system. Also nice is the
fact that you can program the LEDs to read red-to-green
or green-to-red, so that fresh water tanks are green when
they're full, but red when they're empty, whereas waste
tanks are the opposite. And it remembers (or appears
to remember) the settings when the battery is off.
The documentation is not clear on this, but my testing
seemed to indicate that it uses flash memory for it's
programming, so that it remembers the calibration
when off, which is important in a switched boat
DC system.
In operation the unit is fairly accurate, depending
mostly on boat movement and accurate initial calibration.
In practice I find that it lets us know whether I can
use water freely, if it's time to start conserving, or
if it's time to think about where we're going to empty
the waste tank in the next few days. Much better than
finding out at 10:00 at night that the pooper is full,
eh?
New Instrument Pod and Guard Rail
I added an FLS (below) and needed another spot for an instrument, so
I needed a new instrument pod. I also felt that the old instrument pod
was also too close one's eyes and would be better placed farther back,
so I also purchased and installed a new angled (instead of straight)
stainless steel guard rail.
I originally ordered an Edson instrument pod, but when it arrived
and I found out that it was made of steel, so I ended up sending
it back. I wanted a plastic pod that I could work with, as I would have drill and
cut holes in it to mount the instruments. I finally settled on,
and purchased, a blank Navipod 3 instrument pod.
After carefully cutting the holes in the faceplate for the instruments
I was ready to install the pod and new guard rail. So I started to remove
the old guard rail and discovered that the connectors on cables
were too large to feed back thru the pipe! It couldn't be removed without
cutting some of the instrument wires. After a careful analysis, I determined
that the previous owner (or the factory) had to cut the cables in order to
install them in the first place, so I found where they had cut the wires,
and cut them and removed them.
The hardest part of putting the new pod and guard rail back in was that
I had to solder and heat shrink each wire in several fine multistranded
bundles. Plus I needed a foot or two of extra length, so I had to insert,
in some cases, a short length of shielded 9 conductor wire.
I think I had to solder about 40 connections altogether to reconnect everything,
including fashioning tiny aluminum foil strips for multiply shielded wires
(a shielded twisted pair within a 9 conductor shielded cable, sheesh!).
Once that was done, however, everything else went together relatively easily
and all the electronics worked fine. You can see the instruments much better
at an angle and slightly away from you, and I think it looks much nicer than the
old one! So I'm happy with it.
FLS (Forward Looking Sonar)
I'm not sure I needed it, but as a paranoid beginning boat owner, looking for
anything that might help make it safer, I determined to add an Echopilot
FLS (Forward Looking Sonar) to Mandala.
Mandala has Radar, which (theoretically) allows us to see other boats or obstructions
on the surface of the water. However, 90% of the things you're likely to hit with a boat
are under the water, not on top of it! For seeing under the water, like most boats,
I only had a depth sounder, which shows you the depth immediately under the boat,
in feet. That's certainly useful because, for instance when approaching a shoal, if you
pay attention to the depth finder you can see a trend as the depth changes,
and take corrective at some point. But if there was an uncharted reef or some
other abrupt obstruction in front of you, you would not see it until you hit it,
as, once again, the depth sounder looks straight down, and
cannot predict what is coming!
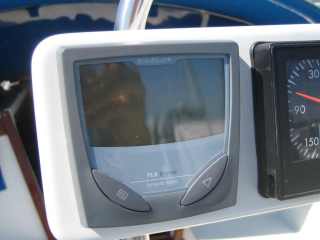
FLS, on the other hand, points forward and down, painting an actual 2-dimensional
picture of a slice of the bottom for upto 300 yards directly in front of the boat.
It can also give you an idea of the density of the bottom by displaying a soft
or fuzzy line as opposed to a solid one. So theoretically, with an FLS on your boat,
if there is a reef or rock ahead of you, you will have some time to take action
before you hit it, whereas a boat without FLS would never know it was there until
they hit it.
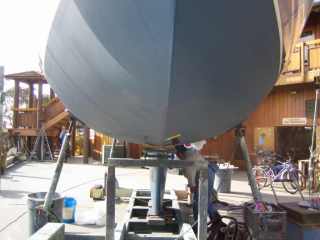
According to specifications, the FLS sensor is supposed to be mounted perfectly
vertical,
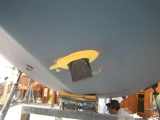
pointing straight down from the bottom of the boat. Not realizing how important that
was, when I had the sensor installed, I let the boatyard install it without a fairing,
so it is now angled about 10 degrees off of the vertical. In practice, this means that what
the sensor sees is (a) slightly shallower than it indicates, and (b) slightly off to
one side of the boat. I will probably have this corrected and install a fairing, the next
time I have the boat hauled.
By the way, a fairing is just a piece of wood glued to the hull which is
angled with a hole in it to such that the sensor can be mounted flush vertical to the
otherwise slanted hull. They are usually smoothed and curved as much as possible
so as to be fairly efficient while moving under water, but they are essentially
just angled blocks of hard wood with a hole in them. Since they present a larger
surface area and more resistance, I wasn't to keen to have one in the first place,
but now I'm pretty sure it would have little or no effect on Mandalas sailing
characteristics and wish I would have installed the fairing when I
first had the chance.
As far as how it works, thus far, I have taken Mandala around and
briefly tried looking at various things under water, but have not made a
systematic effort to really test the unit. Most of the time (in most of the
places I sail) it just shows a gradually descending slope of soft sandy bottom
in front of me, because of where I sail, and I believe this to be generally
representative of the conditions ahead of the boat. Since I don't generally
sail directly towards rocks, I havent had a chance to test the unit in that way,
yet!
As far as seeing things near the surface, in actual usage although I have been
able to pick up returns from bouys, other boat's keels, and seaweed and other
things near the surface, I would not say it is straightforward using the unit
for open water collision avoidance. Perhaps a cargo container would give a clear
return, but I doubt that you could differentiate a log from wave noise.
Perhaps it should be pointing down just a little bit more to avoid a bit more of
the surface (or it could have a software filter to accomplish the same).
The controls are rudimentary and don't allow for any adjustments of
sensitivity or angles of sensing.
All in all I'd say it works pretty much as expected, especially given my
cock-eyed mounting of the sensor. Still, I find it to be a useful addition
to my instrumentation. Coupled with the other instruments it gives me a sense
of security to know that I now have two ways to look under the water.
I can use the FLS and depth sounder to check-and-balance each other.
This is good because sometimes the depth sounder gives spurious
readings and they make me just a little queasy, and the FLS makes me
feel better about them. Each lends to the other.
I think I could even use the FLS, to some degree, as a fish finder if I wanted to,
and in any case it's always fun to have another toy to look at and play with
in the cockpit.
I believe that as I sail more I will learn more about reading the FLS
display. I think you have to learn to read it, like you have to learn to read
a Radar screen. But even now the FLS is, in the short time I've had it, the
instrument of choice, the one my eyes are on, when, or should I say
"if", I find myself in tricky shallow water situations. And since
I don't know what I'll find if I take Mandala on an extended cruise to Mexico,
I think overall that it's a worthwhile and useful addition to the boat.
I will try at some time to do a systematic test of the sonar, and post
pictures of obstructions and screen shots of the FLS so that you'll
get a better idea how it works ...
Bow Pulpit
When I got Mandala the bow pulpit was bent, downard,
in a sad looking way, like she had been punched in the nose!
Apparently the previous owner had run the boat, at slow speed, into a piling
or some other boat or something. It wouldn't have been too bad if the
bend hadn't broken the stainless steel tubing, which was now
rusting and looked like it might break off if you needed it.
Since this was a safety issue, I felt had to correct it.
I could have gotten the old bow pulpit welded and/or re-chromed, but
after calling Catalina Yachts and finding that they had the exact
replacement in stock for a very reasonable price, I decided to get
and install a brand new one. Kudos to the folks at Catalina
Yachts, as not only was it relatively inexpensive, but it arrived
quickly by by overland freight, extremely well packed in large,
custom built cardboard box.
Removing the old bowpulpit was easy, but putting the new one on was a little tricky.
I used the old mounting holes and I ended up having to wrestle the new Bow Pulpit
into place. Plus some of the backing bolts had to be put on in inaccessible
places, by feel only, and only barely by that. Finally, after an afternoon's worth
of explitives, i got all the bolts in, and all the backing washers and nuts on and
tightened. After a further bit of tweaking and adjusting the lifelines in order to
re-attach them (they needed to stretch a few centimeters as the pulpit,
it turned out, wasn't exactly the same size as the old one), the
task was completed, and I had a Shiny New Bow Pulpit !
Engine Control Handles and GPS Bracket
To complete the spiffing up of the cockpit, I replaced the old red and black
plastic control handles with bright shiny new Engine Control Handles.
There was a functional aspect to this as well, as the old handles actually bent
when you pressed on them, leading to less than perfectly accurate control,
particularly when shifting gears.
The handles went on quite easily, but, because they have a slightly larger
"knob" on the top, when pressed forward, the shift lever would hit the guard
rail and thus didn't "click" into gear as securely as I wanted.
So I was also obligated to adjust the transmission linkage to
get it just right, but that was fairly easy, apart from moving the
aft cabin matress out of the way.
Now that it's all done, however, I'm very pleased that I
took the time to do this minor improvement. I also made a bracket for
the GPS, and together
they look really nice.
Steaming Light
What a b@**! this turned out to be!
On our Sail to Catalina, i discovered
that the steaming light was burned out. Since the next thing on our agenda
is to practice night sailing, this had to be corrected, for safety as well
as legal reasons. You don't want to get a ticket or look like a jerk because
you don't have the proper nav-lights at night! really And it's just a light bulb,
right?
Wrong !!
It turns out that the fixture had gone bad. Well, more
accurately, it looks like a fix to the fixture had gone bad.
Apparently it had been repaired before, as evidenced by the
silicon goop where a rubber gasket should have been. And inside
where the wire should have been soldered to a brass
piece, it was instead "compression fitted" (read: jammed back together)
to force contact. You could see where the solder junction
had broken previously, and although the previous solution was
physically secure, the wire had corroded and wasn't making
good contact with the brass any more.
I decided to not fix the old light, and instead went
to West Marine and bought a near exact, tho more modern
and made mostly of plastic, replacement. I also needed
a rivet gun, as I had to remove the old bracket to mount
the new one (although the holes all lined up), as I had
left it in place when removing the old fixture. West marine
had a rivet gun and the right kind (aluminum) of rivets
to ensure that they wouldn't corrode.