Rocket #1 - Aerotech Arreaux with Aiptek Digital Pen-CameraConstruction Details
1. Payload SelectionI started by looking at purpose-built model rocket altimiters. They start at around $60 and will tell you the peak altitude the rocket achieves. Although knowing the altitude would be cool, it didn't take me too long to realize that pictures would be cooler (I'm not trying to set any records YET, he says!). So I looked at ways of getting pictures from the rocket. I looked at using film cameras. The estes astrocam seemed toyish and too limited (one shot per flight). Super-8 movie cameras generally too heavy for this plan. Some folks send up autowinding 110 cameras, but these usually require complicated shutter trigerring mechanisms and timers. Plus old fashioned film would require scanning to get onto a web page or email to friends. I looked at minituare TV camera/transmitter combos. The 2.4Ghz and 900Mhz models (15 miles and 1500 ft line of sight receptivity, respectively) were too expensive. I found a $89 b/w 434 Mhz (UHF Channel 14) combo from Plantraco.com and bought it ( I also got a neato RC blimp to carry it around the house, but that's another story). Unfortunately the thing eats batteries (a fresh 9V lasts less than 15 minutes), and this, coupled with thoughts about all the ground support equipment I would need (UHF capable VCR and TV, power inverter, etc) to record the images, much less the hassle of getting them on the net, chased me away from this idea (although since I bought the darned thing, I might still fly it on something besides the blimp someday). Digital cameras and recorders mostly seemed too heavy/expensive or had the same triggering hassles as film cameras, until I came across the Aiptek Pen Cam Trio (also known as the NISIS Quickpix digital camera) I had seen these floating around on EBay and been checking them out but had initially given up on them due to low resolution and short movie recording times. But the more I thought about it, the more appropriate the little $89 device seemed. Cheap enough to be lost. Digital recording so there's no downlink hassles or bad reception to deal with. Instant upload to AVI on my laptop computer. Weighs less than 2 oz with the two AAA batteries (which last for 2 hours continuous or many many many flights of 7-30 second videos). It has 8M of memory and "films" upto 80 "hi res" pictures (320x240) or 320 "lo res" (160x120) pictures for 7 and 28 seconds of video (at about 12 fps) respectively. 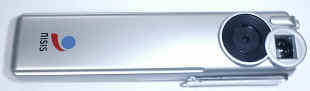
To top it all off, I found this site where this guy had taken the camera apart and photographed it's innards (this is a great idea that he had ... everyone should take all their stuff apart and photograph it and put it on the web!). It was too much! So I ordered the Aiptek Pen-Cam Trio from CompUSA. Here's the inside front of the camera: 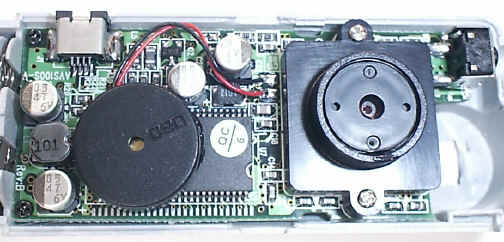
And here is the inside back of the camera (after removing the circut board from the case): 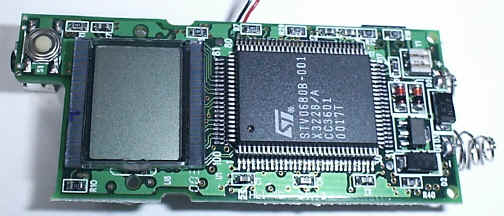
2. Camera ModificationsThe Aiptek has two buttons. One button changes the mode, and the other takes the picture (or executes the command). The way to take movies is to press the mode button once (to put it into 'continuous' mode) and then (within 10 seconds) press the shutter button and hold it down. If you dont do it within 10 seconds it reverts back to single picture mode. If you let your finger up, the movie stops. I was trying to imagine how I would trigger this on the rocket. The 10 second back-to-single-picture-mode was messing me up. I thought about building a timer to just trigger the shutter, but that seemed crude .. another whole circut/mechanism. So I was messing around with the camera and discovered (undocumented) that if you press the mode button and hold it (setting it into continuous mode), then engage the shutter button (holding it down), the camera will be in a state where it will wait indefinitely. Then upon removing the pressure from the mode button it will start filming. Although this sounds complicated, it actually made the planning of triggering much easier. All I had to do was "set the trigger" by pressing the mode button, "arm the camera" by pressing the shutter button, and then let up on the mode button (i.e. at liftoff) to start the camera. I attempted to design a mechanical mechanism that would do the triggering steps, but it would have really kludgy. Although I was hesitant, at some point I finally decided to break open the camera and solder leads to the mode and shutter switches. It was easier than I thought, and once I did it, then the design of the rocket was much easier, since I could use any kind of electrical switch for the mode and shutter functions. 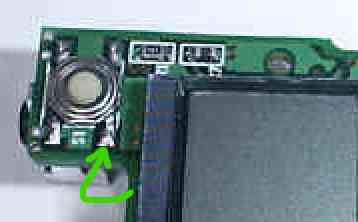
In the above photograph, the green wire is soldered to the 'hot' side of the mode switch, and then wrapped tightly around to the front of the camera. Below, the red wire is soldered to the 'hot' side of the shutter switch, and the black (brown) wire is soldered to ground, which is easily reached just around the front at the base of the shutter switch. 
All three wires are routed around the lens, between the two transistors, and out of the camera case thru a slot I cut in the side. I used an RC aileron three-wire male connector to terminate the lead about 6 inches outside of the camera. 
Now I can switch the camera between projects by merely unplugging it, and the wire's not so obtrusive that I couldnt even carry the camera around in my pocket for general use if I wanted. Also note that I chose to use the existing case. It's not very heavy and seems better than creating a whole new battery mount etc. 3. Rocket ConstructionThe rocket was assembled according to the standard Aerotech instructions (which can be found by clicking here) The only modifications to the stock design involved the payload bay tube, which needs to carry the camera and externalize the controls. I attached the arming switch and external trigger lugs to the bottom of the payload tube (just above the main bulkhead) as shown below. Connected to the lugs and switches are a lead wire (not shown) that terminates in a connector compatible with the one I attached to the camera. 
I fashioned the camera carrier out of a card board tube from the inside of a roll of plastic wrap, using masking tape to make centering rings. Better would probably be to use a properly sized tube and best might be to mount camera directly in the payload tube (replacement tubes are readily available, and cheap - you'd save weight and complexity by dedicating a payload tube to the camera). 
I keyed the camera carrier to the payload tube (using notches where the aming switch and trigger lugs come into the payload tube) and carefully cut 3/4" holes in the carrier and bay in just the right places for the lens (the 3/4 inches was determined by experimenting with the camera's field of vision). Inside the camera carrier, a bulkhead and divider make a nice little compartment that keeps the camera steady (I glued the divider in under pressure with the camera in place to ensure a tight fit). There is a hole in the bulkhead to allow the leads from the payload bay to run up thru the carrier and connect with the camera.. 
The connector wires run from the payload switches and lugs, thru the camera carrier and connect with the camera. I also made a cap that fits inside the carrier to holds the camera down. Here's all the pieces in a row ready for assembly: 
After testing, I found that I had to cut a section of the cap out so that it wouldnt press the shutter button during fligh as shown belowt. Also one must be careeful that the wires in the back do not depress the mode switch or the camera will not start filming when the external trigger is released! 
Finally, I made little window out of some thin clear packaging plastic (which I carefully cleaned and kept scratch free as it is crucial to the final images) and attached it to the outside of the payload bay tube with some electrical tape. 
4. Camera TriggeringAs it turned out, I could "talk" to the camera by merely touching my fingers to the contacts (due to the low voltage CMOS circutry). With the audio beeps and some practice you can program the camera (clear it, change modes, etc) while it is inside the rocket without ever looking at the led screen. 
After placing the rocket on the launch rail, one engages the trigger by attaching a wire loosely to the trigger lugs. The wire is attached to the launch pad by a piece of string. This essentially pushes and holds down the "mode" button. Then one throws the arming switch, which is equivilant to pressing and holding the shutter button. Then you hook up the motor ignitor normally, and ... 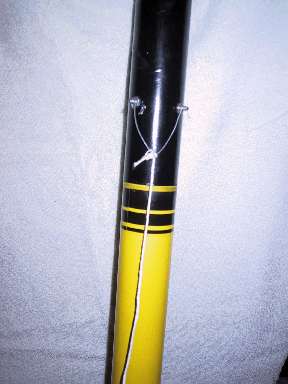
... when the rocket takes off, the string pulls the wire off of the trigger lugs, effectively "releasing" the mode button and starting the film. Anything that can "break" the connection can be used as a trigger. For instance, one could have a piece of aluminum foil that is blown off by the air at liftoff, or to trigger the film to start at apogee (when the ejection charge goes off), one can position some small wires from the lug to a piece of aluminum foil in the payload-rocket joint. 5. Launch weights and Flight SimulationsI weighed all the parts of the rocket, all of the sub assemblies, and estimated final flight configurations, then ran flight simulations on it using the WinSim program. The fully loaded configurations I modelled and their estimated flight parameters are shown in the following table.
Note that there was some kind of a problem in WinSim. When I put in 'direct' masses for things, they didnt add up. Thus for some reason the total weights shown above are about 3 oz shy of the sum of the direct masses. Since I don't claim to understand the math, I presented the resutls from Winsym as is. 6. Other Possibilities:There are a number of experiments I'd like to try with this rocket including the following:
7. ResultsClick here to see the detailed flight log for this rocket. |